Side by side comparison: 360 scenes
1. Once you are inside a 360 scene, you can use the comparison mode to check how the area has changed over time using a split screen.
2. Click the "Comparison mode" on the top right of the screen to split your screen between different dates of the same area.
3. Click the "Change Jobwalk" button on the middle of the screen to see a list of scans that passed from that area so that you can choose which one to view against the current one.
4. Once you click the date you are interested, your split screen will change accordingly.
5. This way you can easily compare scenes in 360. You can return back to the single 360 view by clicking the "360 view" to the left of the "Comparison Mode" button.
Side by side comparison: 3D model
Loading your 3D Model
- The starting point for 3D model comparison is within the 360 view of your scan. First navigate to the scene of interest from the floorplans, and click the third button (represented by building blocks). This will open the side-by-side view, with the Forge Viewer on the right hand side.


Using the 3D model
- Once loaded, Oculo will keep the 3D model in sync as you navigate, pan and zoom within the scan - similar to using the side-by-side comparison mode.

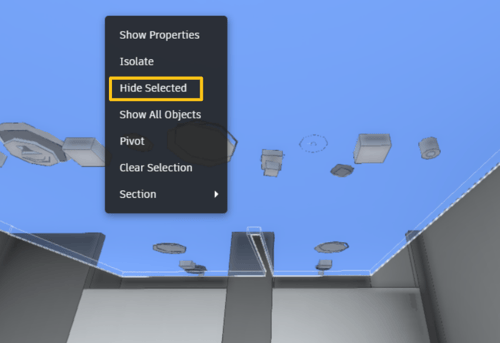
- You are able to select any component within the model (it will be highlighted blue), then a right click will give you the option to Hide Selected components. Selecting Show All Objects will return any hidden objects. Perfect for hiding walls and ceilings that are in the way of a pipework comparison.
- The toolbar along the bottom of the BIM model offer the native Forge Viewer features. The more useful features for comparisons are detailed below.

First Person Mode

By default the Oculo visual scan and 3D model scene remain in sync when navigating. We are able to unlock the 3D model to enable 'first person' navigation of the 3D model in the right half of the screen - follow the video demo below. The padlock in the middle of the screen represents the sync lock, so turning it off allows first person navigation, and turning it back on will return the screens to synchronisation.
Model Browser

The model browser provides the breakdown structure of components within the model. From here you can isolate or hide different levels of the hierarchy, for instance if you are at the earlier phases of construction. You can revert back to the full model by right clicking anywhere in the model itself, and selecting Show all objects. Alternatively, you can hide an individual component in the model by left clicking so it is highlighted blue, then right clicking and selecting Hide Selected.
Note that this breakdown is a part of the 3D model, and may vary in granularity or navigability depending on how the model was initially created.
Component Properties

The model viewer also allows you to view the properties of a component (where this data has been added to the BIM model). To do this, simply select any component in the model so it is highlighted in blue, then click the Properties button. Alternatively you can right click a component, and select Show Properties.
Settings

The Forge viewer settings can be adjusted by selecting the cog symbol, eg:
Configuration -> Display units
Navigation -> Enable gravity (when navigating in First person mode)
Appearance -> Ambient shadows